Install Windows 11 on Unsupported Hardware 🖥️
Learn how to install Windows 11 on unsupported PCs for testing. Follow these steps carefully to proceed safely.

World of OSes
18.4K views • May 6, 2022
About this video
This can be useful for testing, however I would not recommend doing this on your main PC.
List of steps:
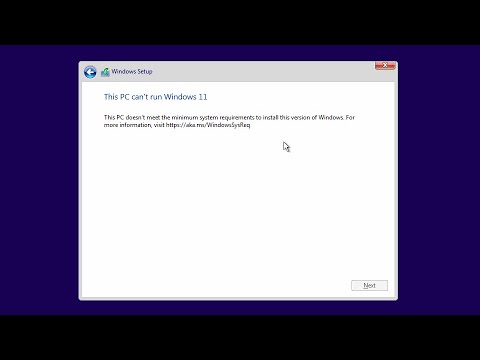
1. On the Windows Setup, press Shift + F10
2. Type “regedit” and press enter
3. Navigate to “HKEY_LOCAL_MACHINE\SYSTEM\Setup”
4. Create a new key called “LabConfig”
5. Inside LabConfig create a new DWORD (32-bit) Value called “BypassTPMCheck” and set the value to 1
6. Create another DWORD (32-bit) Value called “BypassRAMCheck” and set the value to 1
7. Create another DWORD (32-bit) Value called “BypassSecureBootCheck” and set the value to 1.
8. Exit the Registry editor and exit the cmd.
9. On the installer, go back and then next and it should now let you install Windows 11 on unsupported hardware.
List of steps:
1. On the Windows Setup, press Shift + F10
2. Type “regedit” and press enter
3. Navigate to “HKEY_LOCAL_MACHINE\SYSTEM\Setup”
4. Create a new key called “LabConfig”
5. Inside LabConfig create a new DWORD (32-bit) Value called “BypassTPMCheck” and set the value to 1
6. Create another DWORD (32-bit) Value called “BypassRAMCheck” and set the value to 1
7. Create another DWORD (32-bit) Value called “BypassSecureBootCheck” and set the value to 1.
8. Exit the Registry editor and exit the cmd.
9. On the installer, go back and then next and it should now let you install Windows 11 on unsupported hardware.
Video Information
Views
18.4K
Likes
290
Duration
0:53
Published
May 6, 2022
User Reviews
4.6
(3) Related Trending Topics
LIVE TRENDSRelated trending topics. Click any trend to explore more videos.
No specific trending topics match this video yet.
Explore All Trends