How a Two-Way Switch Works and Wiring Diagram
An explanation of how a two-way switch functions and a wiring diagram to help you set up and understand the wiring process for controlling a light from two locations.

CERM PLUG
44.2K views • Mar 15, 2024
About this video
*-----------------------------------------------------------------------------*
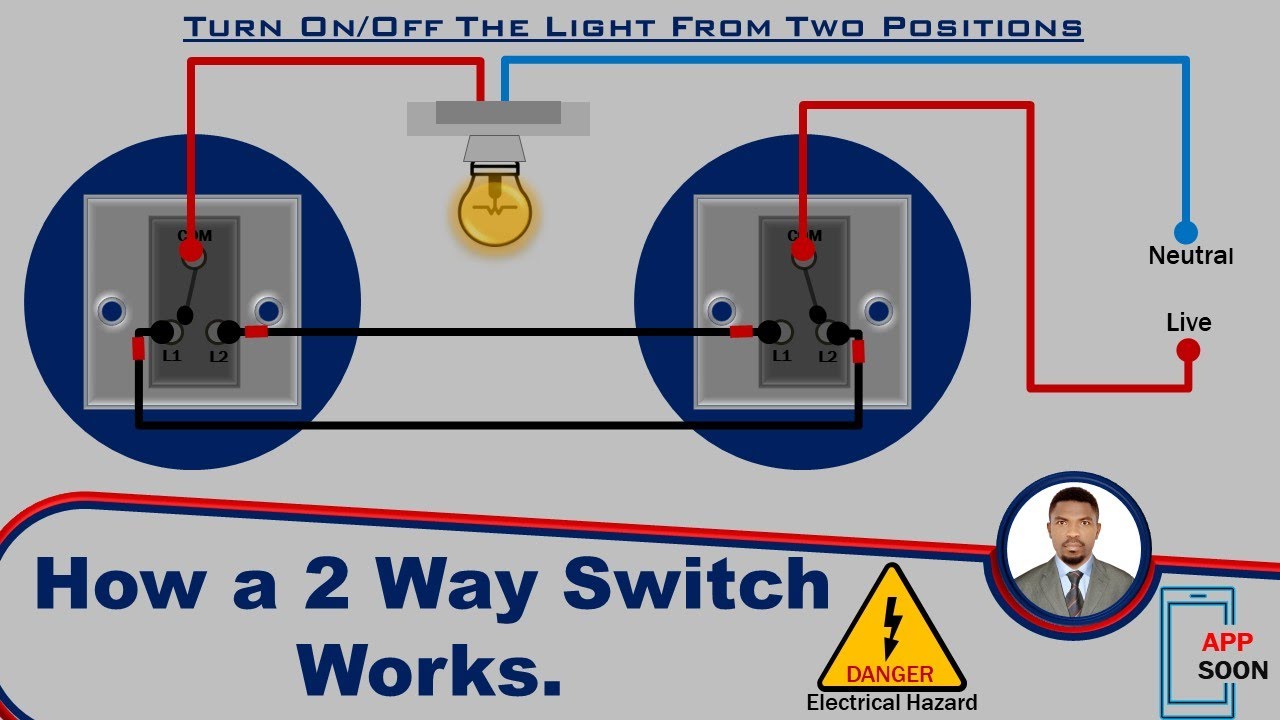
Certainly! Wiring a **two-way switch** allows you to control a single light or fixture from two different locations. Here's a step-by-step guide on how to wire a two-way switch:
1. **Safety First**:
- Before starting any electrical work, **turn off the power** at the circuit breaker or fuse box.
- Use proper safety gear, such as gloves and safety glasses.
2. **Gather Your Tools and Materials**:
- You'll need a **two-way switch**, electrical wires, wire strippers, screwdrivers, and a voltage tester.
3. **Identify the Switches**:
- One switch will be the **main switch**, and the other will be the **auxiliary switch**.
- The main switch is usually located near the entrance to the room, while the auxiliary switch is elsewhere (e.g., at the other end of a hallway).
4. **Connect the Wires**:
- **Main Switch**:
- Connect the **live (hot) wire** to the **common terminal** (usually labeled "COM") on the main switch.
- Connect the **traveler wires** to the other two terminals (labeled "L1" and "L2").
- **Auxiliary Switch**:
- Connect the traveler wires to the corresponding terminals on the auxiliary switch (L1 and L2).
5. **Ceiling Rose Wiring (Optional)**:
- If you're connecting the switches to a light fixture, you'll need to wire the ceiling rose.
- Connect the live wire from the ceiling rose to the common terminal on the main switch.
- Connect the other wires (usually neutral and earth) as needed.
6. **Test the Wiring**:
- Turn the power back on.
- Use a voltage tester to ensure that there's no electricity flowing to the switches.
- Test the switches by flipping them. The light should turn on and off from both locations.
7. **Secure the Switches**:
- Attach the switches to their respective electrical boxes using screws.
- Install the faceplates.
8. **Final Check**:
- Double-check all connections.
- Make sure the wires are properly secured and insulated.
- Test the switches again to ensure proper functionality.
Remember that electrical work can be dangerous if not done correctly. If you're unsure, consult a qualified electrician or refer to our detailed tutorial. Stay safe and happy wiring!
*///////////////////////////////////////////////////////////////////////////////////////////////////////////////////////////////////*
****Light Bulb Downloaded from; www.freepik.com
***** Missed our recent videos? Watch them here:
https://youtu.be/ZjYiVdBYWRc
https://youtu.be/OhDc8kebI3s
https://youtu.be/_fvmiY4djVQ
Video Information
Views
44.2K
Likes
370
Duration
5:12
Published
Mar 15, 2024
User Reviews
4.3
(8) Related Trending Topics
LIVE TRENDSRelated trending topics. Click any trend to explore more videos.
No specific trending topics match this video yet.
Explore All Trends