3.4.3 - Encrypt Files with EFS
The 'Mission Impossible: Secure the Data' Lab aims to secure sensitive financial data on the D: ive using Encrypting File System (EFS). Follow the instructions to complete the encryption process.

Beaird IT
5.6K views • Jan 24, 2025
About this video
# The "Mission Impossible: Secure the Data" Lab
**Objective:**
You're on a secret mission to secure classified financial data on the D:\ drive. Follow these steps to ensure no spies—or clueless coworkers—can get their hands on the goods. Oh, and give your buddy John the special key to access a top-secret file, because teamwork makes the dream work.
---
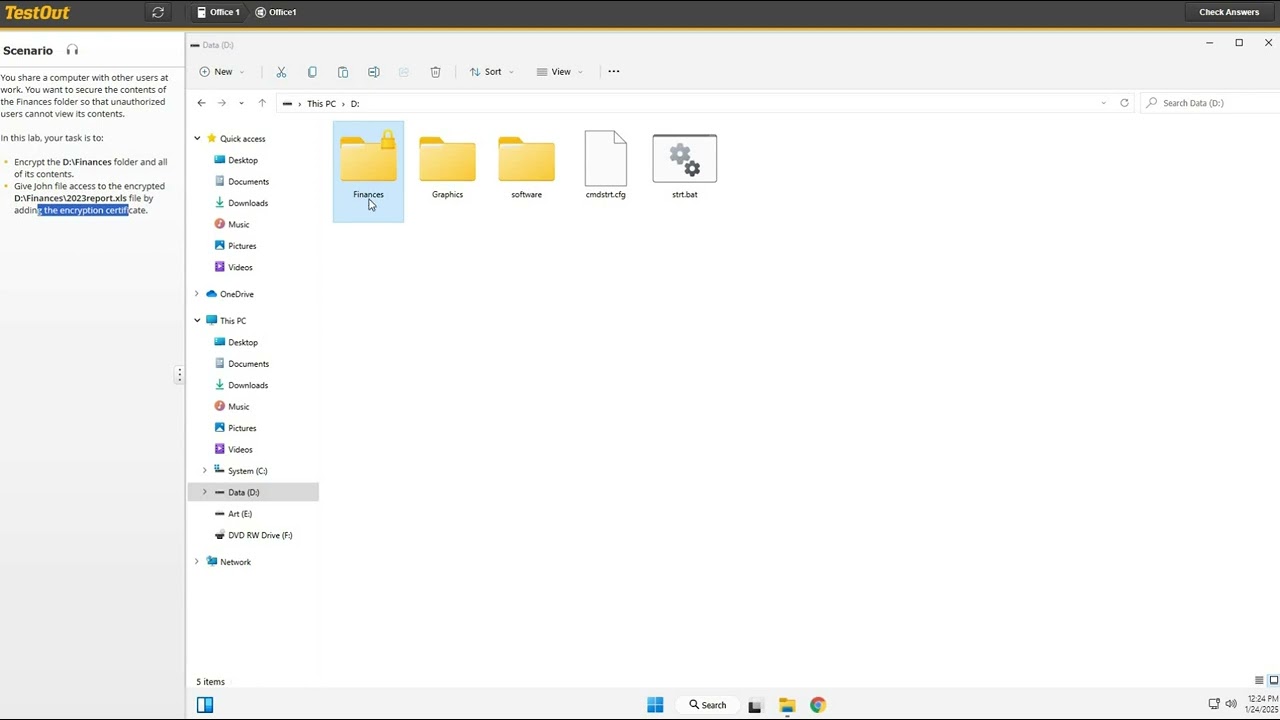
### **Step 1: Break Into the D:\ Drive**
1. Approach the **Windows Taskbar** like you’re unlocking a high-tech vault.
2. Click **File Explorer** (the folder icon—because even secret agents need icons).
3. Sneak into the **left pane** and click **This PC** (because "This PC" sounds cool and possessive).
4. Now, in the **right pane**, double-click **Data (D:)** like it owes you money. You’re in! 🎉
---
### **Step 2: Fortify the Finances Folder**
1. Find the **Finances** folder and hover over it dramatically (optional but recommended).
2. Right-click it like a tech wizard, then select **Properties** (because hackers in movies always click "Properties").
3. Select **Advanced**, because you’re ready for advanced spy-level stuff.
4. Click **Encrypt contents to secure data**, ensuring the evil hackers next door can’t peek inside.
5. Hit **OK**, then **OK** again. Keep clicking **OK** like you’re approving a series of secret documents.
6. Feel free to say, “It’s secured” in your best action-hero voice.
---
### **Step 3: Give John Access (Because Sharing Is Caring)**
1. Double-click the **Finances** folder (but not too aggressively—it’s already encrypted).
2. Locate **2023report.xls**, the crown jewel of this operation.
3. Right-click it and select **Properties**, because that’s what pros do.
4. Head back to **Advanced** (again—it’s where all the cool settings are).
5. Click **Details** like you’re opening a classified dossier.
6. Select **Add**, because John needs his clearance.
7. Hunt down "John" from the list (if he's not there, this part of the mission is a failure). Select him and click **OK**.
8. Close all dialogs with as many **OK** clicks as necessary. It’s like slamming the door on uninvited guests.
---
**Mission Accomplished:**
You’ve encrypted the Finances folder, given John access to the 2023report.xls file, and kept the world (or at least your data) safe. 🎩
Optional: Celebrate by pretending to type furiously on your keyboard while saying “I’m in” to no one in particular.
**Objective:**
You're on a secret mission to secure classified financial data on the D:\ drive. Follow these steps to ensure no spies—or clueless coworkers—can get their hands on the goods. Oh, and give your buddy John the special key to access a top-secret file, because teamwork makes the dream work.
---
### **Step 1: Break Into the D:\ Drive**
1. Approach the **Windows Taskbar** like you’re unlocking a high-tech vault.
2. Click **File Explorer** (the folder icon—because even secret agents need icons).
3. Sneak into the **left pane** and click **This PC** (because "This PC" sounds cool and possessive).
4. Now, in the **right pane**, double-click **Data (D:)** like it owes you money. You’re in! 🎉
---
### **Step 2: Fortify the Finances Folder**
1. Find the **Finances** folder and hover over it dramatically (optional but recommended).
2. Right-click it like a tech wizard, then select **Properties** (because hackers in movies always click "Properties").
3. Select **Advanced**, because you’re ready for advanced spy-level stuff.
4. Click **Encrypt contents to secure data**, ensuring the evil hackers next door can’t peek inside.
5. Hit **OK**, then **OK** again. Keep clicking **OK** like you’re approving a series of secret documents.
6. Feel free to say, “It’s secured” in your best action-hero voice.
---
### **Step 3: Give John Access (Because Sharing Is Caring)**
1. Double-click the **Finances** folder (but not too aggressively—it’s already encrypted).
2. Locate **2023report.xls**, the crown jewel of this operation.
3. Right-click it and select **Properties**, because that’s what pros do.
4. Head back to **Advanced** (again—it’s where all the cool settings are).
5. Click **Details** like you’re opening a classified dossier.
6. Select **Add**, because John needs his clearance.
7. Hunt down "John" from the list (if he's not there, this part of the mission is a failure). Select him and click **OK**.
8. Close all dialogs with as many **OK** clicks as necessary. It’s like slamming the door on uninvited guests.
---
**Mission Accomplished:**
You’ve encrypted the Finances folder, given John access to the 2023report.xls file, and kept the world (or at least your data) safe. 🎩
Optional: Celebrate by pretending to type furiously on your keyboard while saying “I’m in” to no one in particular.
Video Information
Views
5.6K
Likes
96
Duration
2:36
Published
Jan 24, 2025
User Reviews
4.6
(1) Related Trending Topics
LIVE TRENDSRelated trending topics. Click any trend to explore more videos.
No specific trending topics match this video yet.
Explore All Trends